
In this post I show a few of my tip’s for using Varnish for caching and Ghost together.
Don’t cache everything
Caching is good, but we don’t want to cache everything in ghost, we don’t want to cache the admin and preview pages in ghost. Add the following in the sub vcl_recv part.
  # Did not cache the admin and preview pages
 if (req.url ~ "/(admin|p|ghost)/") {
           return (pass);
  }
restart Varnish to activate the changes.
Auto clear cache after a new or modified ghost blog post
When we modify or create a new post in ghost, changes are not immediately available. Because the pages are being cached and Varnish has no knowledge of a new page. This will wait until the cache is expired to retrieve new pages. We can set a short ttl in Varnish, but a better solution is that ghost will notify Varnish to clear the cache.
Add an ACL in the Varnish config, these ip’s are then allow to clear the cache via an URL.
acl purge {
    "yourghostserver.com";
    "10.58.33.224";
}
Add in the sub vcl_recv in the varnish config the following. This will create a url when called that will clear the cache for the matching http host. Change the myblog.com to your site name.
 if (req.url ~ "/clearcache/myblog") {

          # Same ACL check as above:
          if (!client.ip ~ purge) {
                   return(synth(403, "Not allowed."));
          }
          ban("req.http.host == myblog.com");

          # Throw a synthetic page so the
          # request won't go to the backend.
          return(synth(200, "Cache cleared"));
  }
After these changed you need to restart Varnish. And you can test it with curl.
root@revproxy01:/etc/varnish# curl -s -v http://10.68.33.237:6081/clearcache/myblog
*   Trying 10.68.33.237...
* TCP_NODELAY set
* Connected to localhost (10.68.33.237) port 6081 (#0)
> GET /clearcache/myblog HTTP/1.1
> Host: 10.68.33.237:6081
> User-Agent: curl/7.58.0
> Accept: */*
>
< HTTP/1.1 200 Cache cleared
< Date: Sun, 06 Oct 2019 20:31:28 GMT
< Server: Varnish
< X-Varnish: 983101
< Content-Type: text/html; charset=utf-8
< Retry-After: 5
< Content-Length: 316
< Accept-Ranges: bytes
< Connection: keep-alive
<
<!DOCTYPE html>
<html>
  <head>
    <title>200 Cache cleared</title>
  </head>
  <body>
    <h1>Error 200 Cache cleared</h1>
    <p>Cache cleared</p>
    <h3>Guru Meditation:</h3>
    <p>XID: 983101</p>
    <hr>
    <p>Varnish cache server</p>
  </body>
</html>
And we can test if it really clears the cache by checking the http headers from Varnish.
root@revproxy01:/etc/varnish# curl -s -v --output /dev/null https://myblog.com/assets/styles/main.css 2>&1 |egrep "(age:|hit)"
< age: 92
< x-cache-hits: 11
root@revproxy01:/etc/varnish# curl -s --output /dev/null http://10.68.33.237:6081/clearcache/myblog
root@revproxy01:/etc/varnish# curl -s -v --output /dev/null https://myblog.com/assets/styles/main.css 2>&1 |egrep "(age:|hit)"
< age: 0
< x-cache-hits: 0
Now we have setup Varnish with a url to clear the cache. Next is that we are going to automate this from ghost. because we don’t want to manually do this every time we post or modify a post in ghost.
To do this we need to setup a webhook in the ghost admin page.
Go to integrations in the ghost admin menu and a custom integration. Give it a name. for example clear cache.
Then click configure and click add webhook. And fill in the name, event and target url (your varnish serser)
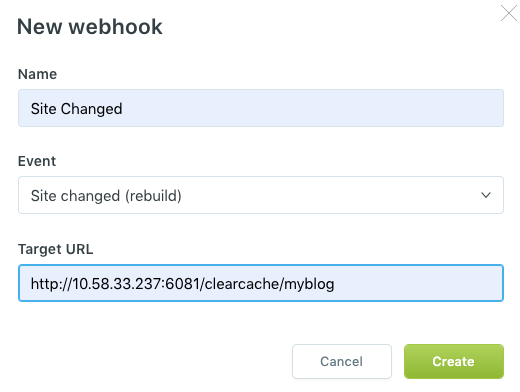
Don’t forget to press also save at the top of the page.
After this every site change wil clear the varnish cache automatically and your new content is immediately available. You can also see when the trigger was last triggered in ghost.
