
Electric vehicles (EVs) are at the forefront of the automotive industry’s shift towards sustainability. However, as more households adopt EVs, the need for intelligent charging solutions becomes critical to avoid overloading home power connections. This is where smart charging and load balancing come into play, ensuring that your EV charges efficiently without exceeding your home’s electrical capacity.
In this blog, we’ll explore how to automate smart EV charging using Home Assistant, DSMR (Dutch Smart Meter Requirements) Reader, MQTT (Message Queuing Telemetry Transport), and Node-RED.
Load Balancing Logic
The load balancing logic is crucial. It ensures that the charging process dynamically adjusts to the available capacity, preventing circuit overloads. For example, if the home starts consuming more power (perhaps the oven and the air conditioner are turned on), the script will reduce the charging rate to maintain a safe consumption level.
If the solar panels are generating excess power, the system can increase the charging current to the EV, thus using the green energy efficiently. Conversely, at peak times when the household consumption is high, the system can reduce the charging current to prevent overloading the system.
Understanding the Components
Before diving into the Node-RED script, let’s understand the components of our smart charging setup:
- Home Assistant: An open-source home automation platform that allows you to control and automate your home environment.
- DSMR Reader: A tool that reads smart meter data compliant with the Dutch Smart Meter Requirements, providing insights into your home’s energy consumption.
- MQTT: A lightweight messaging protocol for small sensors and mobile devices, optimized for high-latency or unreliable networks.
- Node-RED: A programming tool for wiring together hardware devices, APIs, and online services in new and interesting ways.
The Node-RED Script
The Node-RED script acts as the brain of my smart charging system. It processes the data from the DSMR Reader and communicates with the Home Assistant and via ModBus to control the Alfen charger based on the current load of my home’s power connection.
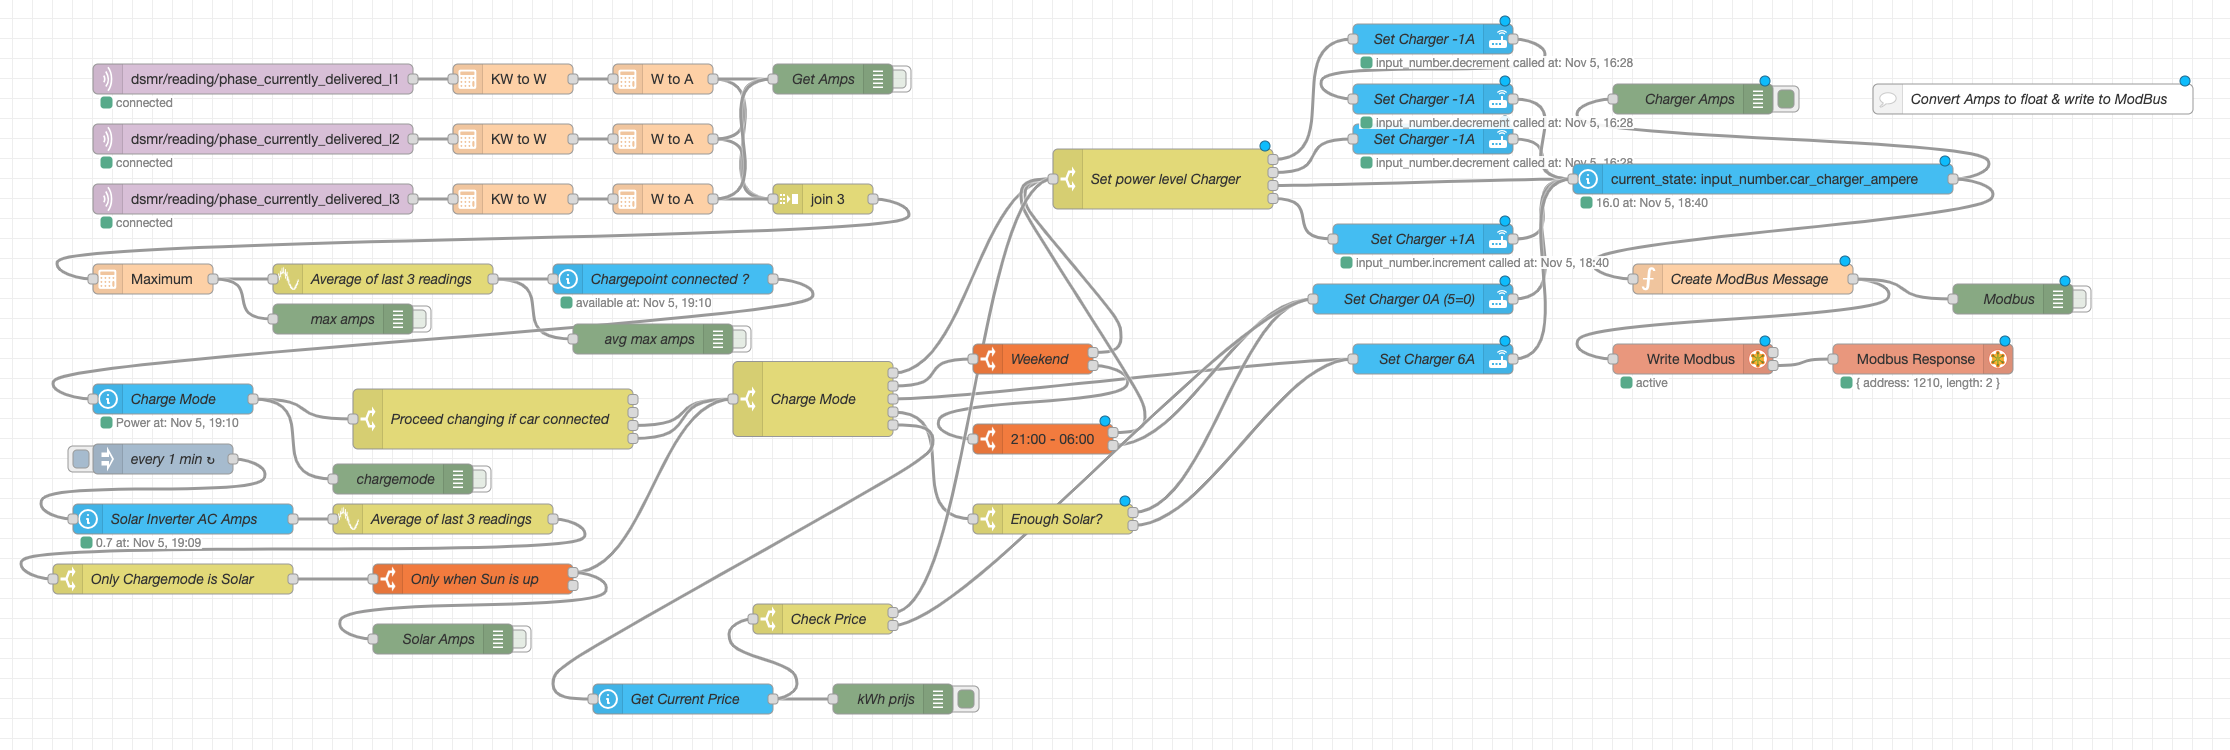
nodered overview
Analyzing the Script
The script is designed to:
- Monitor Energy Consumption: It reads the current energy consumption data from the DSMR Reader.
- Determine Charging Capacity: Based on the total available capacity and current usage, it calculates how much power can be safely allocated to charging the EV.
- Adjust Charging Rate: It sends commands to the Alfen charger via MQTT to adjust the charging rate of the EV accordingly.
- Prevents Overloading: By monitoring the power usage in real-time, the system prevents circuit overloads, which could trip breakers or cause damage.
- Energy Efficiency: It optimizes the use of available power, prioritizing renewable sources when available, and reducing demand during peak times.
- Cost-Effective: By avoiding peak tariffs and utilizing self-generated solar power, it can reduce the cost of charging an EV.
- Automation: The system operates automatically, requiring no manual intervention once set up.
Here’s a breakdown of the flow based on the nodes defined in the JSON:
-
MQTT In Nodes: There are three MQTT input nodes subscribed to different topics (
dsmr/reading/phase_currently_delivered_l1,dsmr/reading/phase_currently_delivered_l2,dsmr/reading/phase_currently_delivered_l3). These nodes are likely receiving data on the current power delivery across three phases of an electrical system. -
Calculator Nodes: Following the MQTT nodes, there are calculator nodes labeled “KW to W” that convert kilowatts to watts by multiplying the incoming payload by 1000. This is followed by another set of calculator nodes labeled “W to A” that convert watts to amperes by dividing by the voltage (assumed to be 230V here).
-
Join Node: The outputs of the “W to A” calculator nodes are then joined into an array, which seems to be used for further processing.
-
Max Calculation and Smoothing: A calculator node takes the maximum value from the array of amperes, and a smoothing node calculates the average of the last three readings of this maximum value.
-
Home Assistant Nodes: The flow integrates with Home Assistant (a home automation platform) to check the status of a charge point and the charge mode using
api-current-statenodes. -
Switch Nodes: Several switch nodes are used to determine the flow of operations based on the charge mode and the connection status of the charge point.
-
API Call-Service Nodes: These nodes interact with Home Assistant to set the charging amperage based on the conditions evaluated by the switch nodes.
-
Time-Based Switch Nodes: There are nodes that ensure certain actions only occur during specific times of the day, likely to take advantage of lower electricity rates or solar production.
-
Solar Inverter Integration: The flow includes nodes to read from a solar inverter, average the readings, and make decisions based on the solar power available.
-
Modbus Integration: At the end of the flow, there are nodes related to Modbus, which is a communication protocol often used for connecting industrial electronic devices. This suggests that the flow may be interfacing with a Modbus-capable device to control the charging process.
In summary, this Node-RED flow is a sophisticated setup for managing an electric vehicle charging station with load balancing across different power phases. It takes into account real-time power delivery, the status of the charge point, the mode of charging, and the availability of solar power. It also includes provisions for interacting with Home Assistant for home automation tasks and Modbus for industrial device communication.
Conclusion
The integration of Home Assistant, DSMR reader, MQTT, and Node-RED to create a smart EV charging system is a powerful example of how home automation can contribute